My Blinkie

I CT For


29 April 2014
28 April 2014


***COMING SOON ***
GORGEOUS Tube *Fire Mermaid* By Arthur Crowe
AMAZING Exclusive Kit *Fire Mermaid* By Rissa's Designs
BOTH WILL ONLY BE available at: www.arthurcrowesfactory.com/store/


27 April 2014

I have a freebie for you today which you can use in your own projects.
I hope you like it!! Please leave a comment if you do! Maybe I will do more :D
Download HERE
25 April 2014


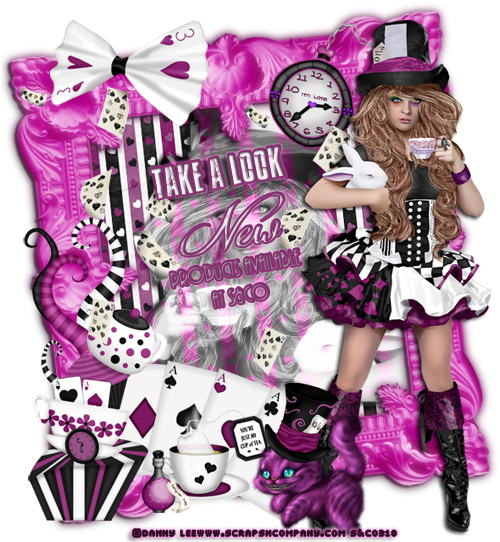
CT LADY MISHKA & KISSING KATE
TUBE 'STRAWBERRIES' HERE
KIT 'STRAWBERRY TEA' COMING SOON FROM KISSING KATE


24 April 2014
***COMING SOON ***
GORGEOUS Tube *2014 Fun Time* By Ismael Rac
AMAZING Exclusive Kit *2014 Fun Time* By Wicked Princess Scraps
BOTH WILL ONLY BE available at: http://xeracx.net/store


22 April 2014


21 April 2014
***COMING SOON ***
GORGEOUS Tube *Kilofina* By Roman Zaric
AMAZING Exclusive Kit *Kilofina* By Lysiras Graphic World
BOTH WILL ONLY BE available at: http://romanzarictubes.com/store/


19 April 2014


18 April 2014

Tutorial written by Kissing Kate on 18th April 2014
This tutorial is my own original work and any similarities with any other tutorial are coincidental and unintentional.
Anyone with a good basic working knowledge of PS CS5 should be able to follow this tutorial. Please feel free to get creative when following this tutorial, it is for guidance only!
Please do not claim this tutorial as your own. Anyone is welcome to use it and I would love to see your results. If you would like to share it in a group please link back to my blog.
Supplies Used
Tube: Violette by Verymany
Kit: Springtime in Paris
Mask: One of my star masks
Font: Travelling Typewriter
Let’s get started!!!!!
Open up a new image 650x650 and fill it white so you can see what you are doing. Call this your background layer!
Open up the tube in a new tab and choose the layers you want to use - merge together, select, copy and paste onto blank image.
Now make a new layer below the tube layer but above the background layer. In this layer add frame 4 to the left hand side of the tube - resize so its smaller than it opens up as. Add another layer below the frame and add paper 6 so it fits in the space of the frame. Now paste the tube and right click on this layer to apply a clipping mask so the tube fits to the paper. Now go apply some texture in blending modes and set the blend mode to hard light.. it gives this layer a nice glow. You now need to do the same again - from frame, to tube, to clipping mask, to blend mode on the right hand side (don't forget to rotate the tube before pasting to the paper though).
Now you need to go back to the layers behind the papers, right above your background layer (sorry for all the movement lol) - here you need to add element 37 (the easel) over to the right hand side.
Before we start adding elements we can add the mask so again add a new layer above the background layer.
Use your chosen mask with paper 10
Above this layer add the following elements as shown on the tag or wherever you may choose:
element 6
element 26
element 37
element 49
element 58
Now we need to go back up to the layer above the frames and we are going to place elements, clustering them together, giving each elements a drop shadow to add depth and interest. Place the following elements or choose your own as seen on the tag:
element 2
element 10
element 11
element 26
element 33
element 34
element 47
element 52
element 81
element 83
element 91
element 92
Now go to your main tube layer again and duplicate it, on the upper duplicated tube layer go into blending options and choose hard light blend mode ..again giving your tube some interesting light.
Now we will add more elements above/in front of the tube layer, carefully placing them where they fit best. Again you can follow my lead or choose your own elements. i used:
element 5
element 6
element 12
element 19
element 29
element 34
element 45
element 71
I used some wordart on the next layer - use your own choice or make your own
Add name
Add copyright
And there you are - all done!!

THIS TUTORIAL WAS WRITTEN BY ARIZONA DREAMS (JESSICA MIL;AM)
THIS TUTORIAL IS MY OWN ORIGINAL WORK AND ANY SIMILARITIES
WITH ANY OTHER TUTORIAL ARE COINCIDENTAL AND UNINTENTIONAL.
PLEASE DO NOT CLAIM MY TUTORIAL AS YOUR OWN. THIS TUTORIAL IS FOR EVERYONE. IF YOU WOULD LIKE TO SHARE THIS TUTORIAL IN YOUR GROUP
PLEASE LINK BACK TO MY BLOG
''VIOLETTE"
FOR VERYMANY
TUBE: 'VIOLETTE' BY VERYMANY
GET IT HERE
KIT: 'WAITING FOR SPRING PART 1&2' BY DEES' SIGN DEPOT
GET IT HERE
FONT OF CHOICE
MASK OF CHOICE
-----LETS BEGIN-----
OPEN NEW CANVAS (800X600) TRANSPARENT
OPEN ELEMENT 74 FROM PART 2 PLACE IN CENTER OF CANVAS
OPEN FRAME 3 FROM PART 1 OF THE KIT (RESIZE SMALLER AND PLACE RIGHT TO RIGHT OF CANVAS) ROTATE COUNTER CLOCK WISE JUST A LIL BIT
OPEN PAPER 11 FROM PART 2 (RESIZE SMALLER & ROTATE COUNTER CLOCK WISE TO FIT UNDER THE FRAME
OPEN ELEMENT 3B ROTATE CLOCK WISE JUST A LIL PLACE ON TOP OF THE FRAME
OPEN ELEMENT 90 FROM PART 2 (RESIZE SMALLER) PLACE OVER ELEMENT 3B LIKE I HAVE MINE
DUPLICATE ELEMENT 90 & PLACE OVER LAYER 4
OPEN ELEMENT 89 FROM PART 2 (RESIZE SMALLER) PLACE OVER LAYER 8
OPEN ELEMENT 46 FROM PART 1 (RESIZE SMALLER) PLACE OVER LAYER 4
OPEN ELEMENT 15 FROM PART 1 (RESIZE SMALLER) PLACE OVER LAYER 9 DUPLICATE ELEMENT AND FLIP HORIZONTAL
OPEN ELEMENT 37 FROM PART 1 (RESIZE SMALLER) PLACE OVER LAYER 11 COPY
OPEN ELEMENT 70 FROM PART 2 (RESIZE SMALLER) PLACE OVER LAYER 8
OPEN ELEMENT 69 FROM PART 2 (RESIZE SMALLER) PLACE OVER LAYER 12
OPEN ELEMENT 100 FROM PART 2 (RESIZE SMALLER) PLACE OVER LAYER 11
OPEN ELEMENT 100 FROM PART 2 (RESIZE SMALLER) PLACE OVER LAYER 6
OPEN ELEMENT 19 FROM PART 1 (RESIZE SMALLER) ROTATE COUNTER CLOCK WISE A LIL & PLACE OVER LAYER 14
OPEN ELEMENT 91 FROM PART 2 (RESIZE SMALLER) FLIP HORIZONTAL AND PLACE OVER LAYER 1
OPEN ELEMENT 56 FROM PART 2 (RESIZE SMALLER) PLACE OVER LAYER 17
OPEN ELEMENT 77 FROM PART 2 (RESIZE SMALLER) PLACE OVER LAYER 19
OPEN ELEMENT 25 FROM PART 1 (RESIZE SMALLER) PLACE OVER LAYER 11 COPY
OPEN ELEMENT 27 FROM PART 1 (RESIZE SMALLER) PLACE OVER LAYER 17
OPEN ELEMENT 42 FROM PART 1 (RESIZE SMALLER) PLACE OVER LAYER 4
OPEN TUBE VIOLETTE (RESIZE SMALLER) FLIP HORZIONTAL PLACE OVER LAYER 8 DUPLICATE TUBE PLACE OVER LAYER 20 (ERASE THE BOTTOM HALF OF THE DUPLICATED TUBE) NOW ADD DROP SHADOW (DISTANCE 5) TO THE TUBE...NOT THE DUPLICTED ONE
OPEN TUBE VIOLETTE (CLOSE UP) RESIZE A BIT SMALLER PLACE OVER LAYER 7 MERGE (CTRL+ALT+G) CHANGE OPACITY TO 40% DUPLICATE LAYER CHANGE BLEND MODE TO SCREEN THEN FILTER>BLUR>GAUSSIAN BLUR 5.0 THEN MERGE DOWN ADD DROP SHADOW
OPEN ELEMENT 44 FROM PART 1 (RESIZE SMALLER) PLACE ANYWHERE YOU'D LIKE
OPEN ANY MASK AND USE WITH PAPER 15 FROM PART 2 MAKE IT THE VERY BOTTOM LAYER
YOU MAY USE MY TAG TO SEE WHERE TO PLACE THE ELEMENTS
OR YOU CAN GET AS CREATIVE AS YOU'D LIKE AND PLACE THEM
WHERE YOU WANT THEM. ADD A DROP SHADOW TO EACH ELEMENT
TO GIVE IT MORE DEPTH.
ADD NAME/QUOTE OR WHATEVER YOU'D LIKE
ADD CORRECT COPYRIGHT INFO
YOUR FINISHED, THANKS FOR FOLLOWING
17 April 2014
***COMING SOON ***
GORGEOUS Tube *2014 Tight Dress* By Ismael Rac
AMAZING Exclusive Kit *2014 Tight Dress* By Wicked Creationz
BOTH WILL ONLY BE available at: http://xeracx.net/store


16 April 2014
****NEW RELEASE****
AWESOME Tube *Strawberry Cowgirl* By Arthur Crowe
AWESOME Exclusive Kit *Strawberry Cowgirl* By Kizzed By Kelz
ALL WILL BE available at http://www.arthurcrowesfactory.com/store/


15 April 2014
SPECIAL BUY 4-14-14 TO 4-15-14
Spend any $$ in the store and get this cute Easter tube 2013 Pretty Bunny Girl and matching kit. Just add them to your cart at check out and GC is not accepted as a form of payment. http://xeracx.net/store/
Spend any $$ in the store and get this cute Easter tube 2013 Pretty Bunny Girl and matching kit. Just add them to your cart at check out and GC is not accepted as a form of payment. http://xeracx.net/store/


14 April 2014


13 April 2014


CT forum set using the gorgeous artwork of Alicia Mujica and scraps by A Space Between
Tube: Blossom
Kit: Backyard Friends


On Saturday, March 22, 2014, at 10:37 a.m. local time, a major mudslide occurred 4 miles east of Oso, Washington, when a portion of an unstable hill collapsed, sending mud and debris across the North Fork of the Stillaguamish River, engulfing a rural neighborhood, and covering an area of approximately 1 square mile. As of April 11, 2014, the Snohomish County Medical Examiner's office confirmed that 36 people had died and 7 people remained missing or unaccounted for.
Several designers have banded together in the name of hope, love and strength to bring you this collab of kits and cu items. 100% of sales of this collab and donations (button on storefront) is earmarked for the families of Oso. Every week a donation will be made to the Cascade Valley Hospital Foundation where all money goes directly to the victims and their families.
Designers that took part in the Collab:
Artlor Designs
A Space Between Designs
A Wishful Design
Black Widow Creationz
Carolann Creations
Celtic Bairns
Craftypoly
Crystals Creations
Dee'Sign Depot
Dreamn4ever Designs
Evol Angel Scrapz
Farrah's Designer Scraps
Foxy's Designz
FwTags Creations
Grumpy Grandma Designs
Honored Scraps
Icy Blue Mystic Design's
Kai Kreations
Kizzed by Kelz
Kissing Kate
Misty Scraps
Moonbeams & Spiderweb
P4DSDezignz
pamkez
Pink Paradox Productions
Redheaded Ladybug Scraps
Seraph Creations
Serenity Designs
Soxsational Scraps
Timber Scraps
Whispy's D'zines
Find the Collab at Treasured Scraps for $10 - if you don't want to buy the collab there is an option to make a donation on the page
12 April 2014


Subscribe to:
Posts
(Atom)